If you (like me) can't download the driver thought the console of Geronimo because you're behind a proxy then use the following steps to deploy your own database driver into Geronimo:
- Download the JDBC driver from your vendor (e.g. the MySQL JDBC Driver).
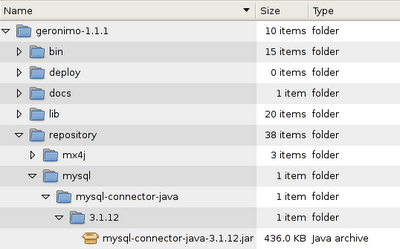
- Create a new folder inside the Geronimo repository folder named after the database vedor (e.g. mysql).
- Create another folder with a description of the driver as name (e.g. mysql-connector-java).
- Create a third folder with the version number as name (e.g. 3.1.12).
- Now put the jar into the last created folder and name him after this structure: $description-$version.jar (e.g. mysql-connector-java-3.1.12.jar). Keep in mind that the description and the version number of the file name must match it's parent folders.

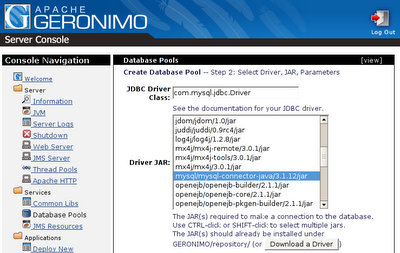
As the driver is now available inside Geronimo start the server and browse to the console (http://localhost:8080/console/). Enter your user name and password (defaults are system/manager) and select the link "Services / Database Pools" from the console navigation.

Create now a new database pool by using the database pool wizard. Enter a name for your pool and select your database type (e.g. MySQL) and click "Next". The new database driver you just added should be available as "Driver JAR". Select it, provide the other required settings like authentication information and server name and click again on "Next". To finish the wizard click "Skip Test and Deploy".
1 comments:
Thanks for this post. I have spent a LONG time attempting to add a postgres driver as there is little/no documentation on the folder structure and I am behind a proxy.
Thanks again!
Post a Comment